There are some fundamental changes between the controls and settings in Lightroom 3’s Process 2010, and Lightroom 4’s Process 2012. I have described these differences, and shown some of the value of the new controls, in previous articles, as well as the weaknesses inherent in the older process. It has been pointed out to me that none of these articles actually analyze the differences in the controls, and describe how they effect images; so that is what I will do here. Those of you who are determined to understand the new process fully may find some answers in the testing notes below.
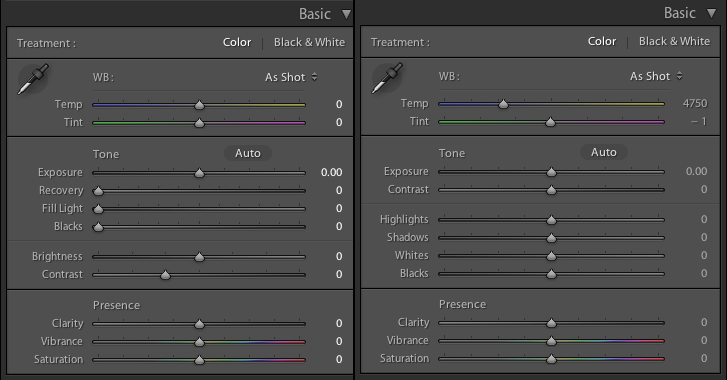
Both Process 2010 and 2012 are available in Lightroom 4, with previously imported images defaulting to Process 2010 (or if they are of Lightroom 2 or earlier, to Proces 2003), while newly imported images will be in Process 2012. It is possible to change between these processes, but there is not exact equivalency, as you will see in this article. The illustration below compares the Basic Controls in the Develop module of Lightroom 3, on the left, and Lightroom 4, on the right.

Testing Methodology
In order to analyze changes caused by the various controls, test images where shot of the Datacolor SpyderCheckr target, where the ten percent gray ramp patches, and the additional 5% and 95% gray patches, were used to determine how adjustments were effecting the image tonal range. These numerical changes were compared to the visual changes in the image itself, and the graphical changes in the RGB histogram of the image at the top of the Lightroom Develop Mode’s right panel. Shots of the Datacolor SpyderCube were similarly tested, in part to help analyze the Lightroom Processes, and in part to determine how best to use the SpyderCube with these new controls, which I will document in a future article. Checks were done between Lightroom 3, and Lightrooom 4’s implementation of Process 2010, to be sure that the two were equivalent. Further testing was done in Lightroom 4.1, using the p2010 and p2012 settings, which is much more convenient than running two versions of Lightroom simultaneously.
White Balance (graphical change)
While the Color Temperature and Tint controls in the White Balance section display differently between the versions, this is simply a matter of Process 2012 now displaying the actual Color Temperature value in Degrees Kelvin even at the “As Shot” setting, instead of defaulting to zero, and not offering any useful Color Temp info until the slider had been moved from that location in Process 2010. The functionality of the controls in this section is unchanged, so will not be discussed further.
Exposure (range change)
The Tone Controls section has the same number of controls as before, but their names, groupings, and some cases their control types have been changed, between p2010 and p2012. The first control to analyze is the Exposure slider. It now has a range of negative five to positive five in Process 2012, increased from four units in each direction in the previous version. This extra range may come in handy for some extreme situation, but the functionality of the control in its usual range appears unchanged. Exposure stretches (positive move) or compresses (negative move) all tones. No clipping of values at the black end occurs when compressing the Exposure downward, but significant blow-out of highlights occurs when increasing the Exposure in either Process.
Contrast (location change)
Contrast functions by stretching all values out from the center with a positive adjustment, or compressing them towards the center with a negative adjustment. The effect is not symmetrical with much more change taking place in the darker end of the range than in the lighter end. Contrast adjustments do not clip either near whites or near blacks, compressing them towards the ends instead. This behavior appears identical in Process 2010 and Process 2012. So while the Contrast control has a new location, now paired with the Exposure control at the top of the Tone section, its functionality can be considered unchanged.
Recovery (removed)
This Process 2010 control no longer exists in Process 2012. It is a single directional slider, with the default position at the zero end. Moving the slider away from zero does not darken white, but darkens near whites and highlights, while having little effect at the dark end of the range. This is a “gamma-like” adjustment, where both ends are fixed, and the adjustment centers in the highlight zone, moving only in the direction that reduces the brightness of tones from their default values.
Fill Light (removed)
This is another Process 2010 control that no longer exists in Process 2012. It is also a single directional slider, with the default position at the zero end. Moving the slider away from zero does not lighten black, but lightens near backs and shadows, while having little effect at the light end of the range. This is another “gamma-like” adjustment, where both ends are fixed, while the adjustment centers in the shadow zone, moving only in the direction that increases the brightness of tones from their default values. The functionality of the Fill control appears to be a symmetrical opposite of the Recovery control.
Blacks (range and location change)
The blacks control in Process 2010 is a single directional control, but the default value was not zero. Offset from zero varies, but for all cameras I checked it was at 5, while for non-RAW images, it was at zero. Adjusting the control back towards zero decreases the default clipping of blacks. Increasing the slider value clips an increasing number of near blacks to black. In Process 2012, the Blacks slider is now a bidirectional slider, with a default of zero. The lack of a default offset here is compensated for elsewhere in p2012; partially with changes in the Tone Curve default and engine (more on that below).
Brightness (removed)
This p2010 control has no equivalent in p2012. The Brightness control is a bidirectional slider, which defaults to zero for non-RAW images, but defaults to a value of +50 with all tested cameras. The Brightness control runs to positive and negative 150, and compresses but does not clip at the black end with negative values. It clips significantly at white with positive adjustments. The control has a similar function, when moved in the positive direction, to the Exposure slider, but does not have as much range.
Highlights (added)
This new Process 2012 control is bidirectional, and defaults to zero, as do all the new/replacement controls. Positive adjustments stretch highlights towards white, compressing near whites to white without clipping them, and stretching highlights in the midtone end of the affected zone. Negative adjustments are more in line with previous Recovery adjustments. They compress highlights into the midtone zone, while stretching them in the near whites. There is also a parametric Tone Curve function of the same name. Both Highlights controls have very similar effects, though they are applied separately. It makes sense not to raise one of these controls while lowering the other, as it would be counterproductive, but there might be cases in which minor adjustments in the same direction are made in both.
Shadows (added)
This new p2012 control, like the others, is bidirectional and defaulted to zero. It is an mirror of the Highlight control, used to control shadow detail versus image punch. Again there is a control of the same name in the Tone Curve section, but here the effect of the Tone section’s slider has a broader effect than the similarly named control under the Tone Curve section, so one or the other may be selected depending on whether a more localized or more broad effect is desired.
Whites (added)
This new bidirectional, zeroed p2012 control is somewhat analogous to the now older Brightness control, but with much less range in the negative direction. It does not have the Highlight control’s protection against clipping, if moved in a positive direction. It raised all tones, and clips those near white progressively as stronger positive adjustments occur. Whites are also not held when negative adjustments occur, so lowering the Whites control will darken whites along with other values.
Blacks (again)
This new p2012 control is the mirror of the White control, producing the same results, from the other end of the tonal range. Its described above, and included here only to round out the “new four” as this is the only control of the four to retain its name, though it has changed its function considerably.
The Other Change: Tone Curve Default
The Tone Curve defaulted to Medium Contrast in Process 2010. It defaults to Linear in Process 2012. Moving an image from p2010 to p2012 forces a change in Tone Curve, rather than retaining the previous setting; since apparently retaining the setting does not retain the tone densities anyways. Medium Contrast in p2010 and Medium Contrast in p2012 mean different things, so aligning them would not be appropriate. This would indicate changes to the tone engine in Process 2012, and not clear equivalency for older images, which had been processed previously in either Process 2003 (Lightroom 1 or 2) or Process 2010 (Lightroom 3). This means that you should not automatically update the Process for pre-corrected images and expect matching tonalities. If you choose to move the Process version of an image to p2012, be prepared to readjust the tonality.

Interactions and Improvements
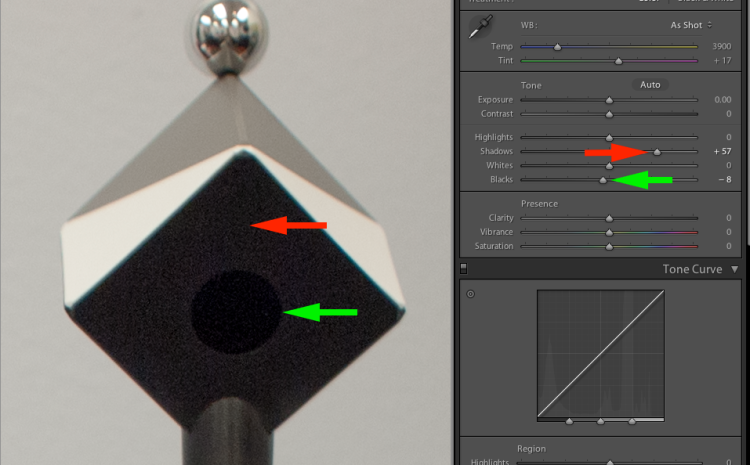
The new, centered, bidirectional controls offer a few advantages over the older versions. Control of black clipping against shadow detail is the clearest example. It is now possible to use the Blacks control to clip noise from the levels nearest to black by moving it in a negative direction, while independently opening the shadow area by moving the Shadows control in a positive direction, as illustrated above. Interaction between the new, and more symmetrical, controls is clearer, as well as more effective. Its now possible to adjust highlight and shadow areas without unintended clipping of whites or blacks, while it is also possible to make powerful adjustments to images from either end, both without clipping, if the end adjustment is inward, or with the inevitable clipping if the adjustment is outward. The engine underneath the new Process is improved, and more drastic adjustments to images can now be made without the the kinds of artifacts that the older, less linear, process produced.
Credits: C. David Tobie, Copyright 2012. Website: CDTobie.com Return to Blog’s Main Page
Thorough and helpful analysis, thks David.
Thanks. More of a testing process than anything else, but I needed to go through it myself, in order to determine how best to use the SpyderCube with LR4. So I figured cleaning my notes up and publishing them might save a few others from having to go through similar tests. I hope to do have the opportunity to write some more engaging articles soon, once I’m done slogging through the innards of LR4 and PS CS6!
great post.. im a big fan of lightroom 3. looks like there are quite a few changes.. and im not sure if many of them are real improvements. i dont want to change my workflow for no benefit. i need a bit more convincing. thanks for sharing all this!
If you need more convincing of the advantages of Lightroom 4, take a look at my other articles on the topic. The Process Example post (Maine Barn image) shows it doing things LR3 can’t manage, and the Conversion Example (Tuscan Window image) post shows artifacts, like double edges, from earlier versions being avoided in LR4.