Datacolor’s SpyderCube can be used to set white balance and exposure settings by shooting it in an initial image under a given lighting condition, correcting basic settings in RAW converters such as Adobe Lightroom, and then applying those corrections to all other images shot under the same conditions. Adobe’s new Lightroom 4 defaults to a new set of RAW import controls called Process 2012, which function differently than previous Lightroom controls. This article outlines the differences between the previous Process 2010 and the new Process 2012, and how to achieve similar results from the two different processes when adjusting images using the SpyderCube.
The controls and their default settings for the Basic tools in the Develop Mode of Lightroom under Process 2010 are shown below on the left, with the Process 2012 equivalent controls, also at default settings on the right.

Images which were previously imported through Lightroom 3 will appear in Lightroom 4 using Process 2010; older images imported using Lightroom versions 1 or 2 will show as Process 2003. New imports in Lightroom 4 will appear as Process 2012 images. This brings two questions to mind; can images be converted from Process 2003 and 2010 to Process 2012 without visible changes? Not automatically, as explained in an earlier article. But with careful tweaking, the results can be very close, as we will demonstrate here.
Below are the copies of the same RAW file, one opened at defaults in Process 2010, the other opened at the default settings in Process 2012. Clipping warnings or white and black ends are turned on in both images, to show the relative clipping the two defaults produce.

There are some differences in the densities and clipping, due to the differences in the defaults, and the different default Tone Curves in the two Processes. Next I use the SpyderCube to correct the p2010 image in the manner that the Cube has been used to correct images with Lightroom previously. The resulting adjustments are shown on the left below. I then adjusted the p2012 version of the file to as close to identical as the rather different controls in p2012 allowed. These adjustments are on the right below.

These adjustments resulted in the pair of corrected images shown below. As you can see, there is not much difference to the eye. However, the new controls in Process 2012 have other advantages not apparent here that are well worth the upgrade.

Below are the same two corrected images, with black and white clipping warnings turned on.

As you can see, the black clipping areas are nearly identical. The white clipping is somewhat reduced under Process 2012, due to changes in how the controls function.
Under any Process, the first adjustment is to set the White Balance by using its eyedropper to sample from the center of the lighter of the two gray faces, which represents the primary light source’s color temperature and tint. Under Process 2003 and 2010, the lighter white face was then adjusted to a value of about 90%, using the Exposure control. Then the lighter gray face was adjusted to a value ranging from 50% for shots in direct sunlight to higher values in lower light conditions. This was done with the Brightness control. Further fine tuning of Exposure and Brightness are often necessary, to compensate for each other, until the target percents are shown in both the primary gray and primary white samples. Finally the blacks were adjusted until an appropriate visual distinction was visible on a calibrated monitor in proper editing conditions (dim ambient lighting), resulting in a black value usually in the range of 10%, if there was splash lighting hitting the black face, or as low as 5% if there was not. White and gray values are rechecked if there is significant adjustment for the blacks, and adjusted if necessary.
Under Process 2012, it would seem that the nearest equivalent to this method would use Exposure to set whites, Whites to set grays, and Blacks to set blacks. But this does not produce the expected results with the new controls.
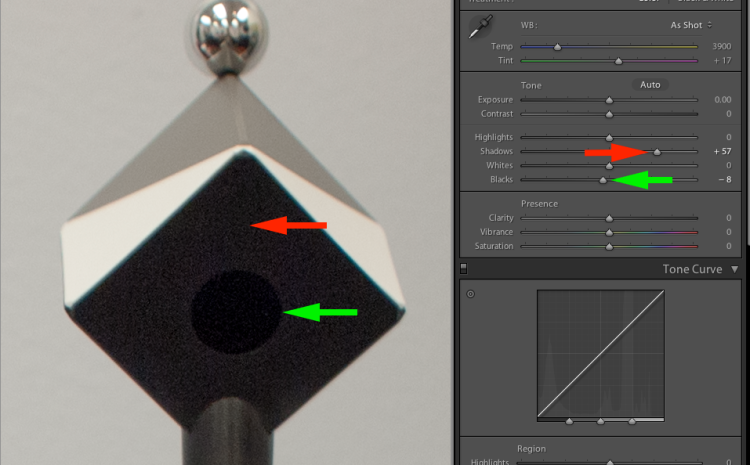
Instead a significantly different method can be used to obtain similar results. Once the image is white balanced, the Exposure control is used next to set the lighter gray face to the desired level. Then the Whites control is used to set the lighter white face to the appropriate level, with minor adjustments to the Highlights control if needed for optimal results. Again, these are tuned until gray and white levels are appropriate. Now the Blacks control can be adjusted to control black clipping in the SpyderCube’s black trap, while the black face surrounding the trap can be adjusted using the Shadows control. Finally, checks of white and gray are done again, once black adjustments are complete. This method now has five controls which can be brought into play, instead of the three used in earlier Processes, offering finer control of shadow to black ratios and black clipping, and highlight to whites ratios and white clipping.
Notice in the adjusted settings image above that Process 2010 editing increased the Exposure significantly, while reducing the Brightness (which started at a default of +50). Under Process 2012, Exposure is increased only fractionally, while Whites are increased significantly. Lightening an image using the Whites control increases the brightness of the dark areas less than the Exposure control, so effects the grays of the SpyderCube less, for a similar change in the Cube’s whites than the Exposure control. It is the differential between these two controls that is being used to control highlight values versus midtone values, and produce some, but not too much, white clipping in the chrome ball on top of the Cube to assure specular highlights are correctly set. Similarly the Blacks control, which clips, and the Shadows control, which does not, are played against one another for clean blacks in the black trap, and appropriate shadow detail in the black face.

Credits: C. David Tobie, Copyright 2012. Website: CDTobie.com Return to Blog’s Main Page
Started to like the way the new lightroom works! probably more work then v3 but more control and take a little more time too
Yes, with the additional control comes the extra effort of adjusting more interconnected sliders. But if this can be done on a sample image with the SpyderCube in it, then applied to a whole series of images, it’s a minimal increase. If it has to be done on every image, by trial and error, then it will indeed be slower. But the extra power can be very impressive, as my earlier example adjusting the image of the weathered barn showed. And it can eliminate posterization and reversals, as my article on the Tuscan Window image showed.
I find it unfortunate that LR doesn’t seem to have the ACR capability to place up to nine Samplers. Or am I missing how that would be done?
Yes, it is an odd omission in Lightroom. Typically it offers more than ACR, not less. I’d love to see it added.
I attempted to add a “Feature Request” to the Adobe forum for Lightroom, but it isn’t clear if it was submitted ok. Perhaps “a poor craftsman blames his tools”, but I’ve been underwhelmed by the forums that Adobe provides.
The direction that help and support have taken for many companies over the last few years leaves a lot of people unsatisfied, as they are looking for something else, from another era. Such as real user guides, in detail, and maybe even in print. And real support people on the other end of the phone. But what many companies are doing is linking “help”, not to a help file installed with the application on your computer, but to user forums on the web. And shifting a lot of direct support to the forums as well. Frankly, I have stopped attempting to use anything labelled “help” in any Adobe app. I just formulate my own search criteria and search the web, finding answers in third party articles of blog posts, or in third party forums, or occasionally even in Adobe’s forums.
Hello (again),
Your very helpful article mentions LR % values (like 90%, 50%, 5%, etc.). I have CS5/ACR 6.7 and also LR 4.3. I’m prettey “fluent” in ACR RGB values, but much less so with LR percent values. I’d appreciate seeing the equivalent ACR RGB values that correspond to LR.
My speculations (untagged, so dependent on working space?):
50% –> ~ 128,128,128
90% –> ~ 240,240,240
5% –> ~ 10,10,10
You were viewing the article for Lightroom; for ACR values please take a look at the article on using the SpyderCube with Photoshop CS6 and ACR 7.1:
https://cdtobie.wordpress.com/2012/07/20/using-the-spydercube-with-photoshop-cs6-camera-raw-7-1/
> I have CS5/ACR 6.7 and also LR 4.3 (now 4.4)
Is there an older article on “workflow” using sliders in ACR 6.x and/or LR3.x (both with PV2010) to find the appropriate Sampler values for the SpyderCube?
This retired hobby’ist is unenthusiastic on upgrading to CS6, CC, or LR5. For most of what I do, the combination of CS5+LR4 works ok. The exception is when I attempt to do “by the numbers” with a SpyderCube for dynamic range starting points. An example would be repro-graphic type photography (such as pictures of fine art or volunteer work at a museum with their curator).
I find it very tedious and error prone to use LR4 directly to get the right values for PV2012, due to the missing Samplers that ACR has.
A “hold your nose” work-around I’ve been using is:
* getting close with ACR 6.7 sliders with PV2010
* make a snapshot
* then importing into LR4.4 and making another snapshot
* some tweaking of PV2012 sliders
My confidence level in the above “workflow” is not all that high as far as getting accurate results.
Process 2012 covers all version of Lightroom 4 and 5. So unless you are using LR3 or older (in which case I would highly recommend you upgrade) then my articles on using Lightroom all apply.