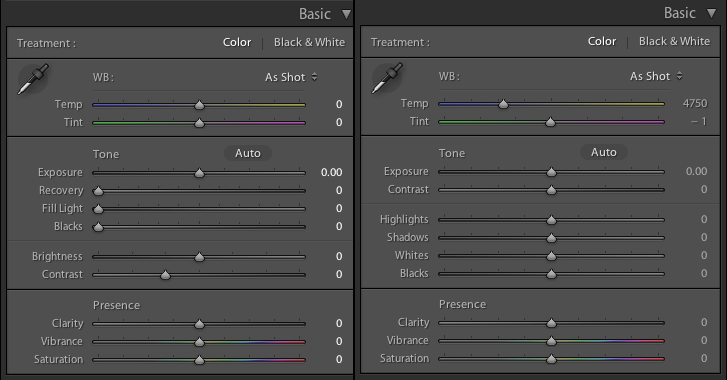
- Adobe’s Photoshop Lightrooom 4, and its recent update v4.1 offer a new set of functions, defined as Process 2012. These new functions add or remove a control or two, and reworks others. While this is not as radical a set of changes as moving from Photoshop CS5 to CS6, it still requires some acclimation, though offering significant new potential in return. This article deals with the renovated Basic controls at the top of the Develop Mode’s right panel. Lets start by comparing Lightroom 3’s Basic controls to those in Lightroom 4.

A quick comparison brings to light that White Balance and Presence sections are unchanged. But the Tone section has been reorganized. Here the Exposure control hasn’t been altered, but Contrast has been moved to a group with Exposure, and Contrast’s old partner, Brightness has disappeared… or has it?
The former trio of Recovery (a Hightlight function), Fill Light (a Shadows function) and Blacks (a, well, Black function) have been changed to a more symmetrical set of controls where a new Whites function balances the existing Blacks function, and a Highlights function balances a Shadows function. Since Brightness is now missing it would be tempting to assign its former role to the new Whites slider, assign the Recovery function to the new Highlights function, claim Fill is the equivalent is Shadows, and be done with it.
While this might all make general sense, the actual results of using these sliders is not the same as those from Lightroom 3’s Process 2010. The Recovery and Fill sliders in LR3 were “use with caution” controls. If both were manipulated to a significant degree, then unintended results could occur; usually in the form of posterization or even reversals in zones with transitions from shadows directly into highlights. In some cases a distinct double edge formed in sharp transition zones. Such results required returning to Lightroom, and reducing or removing the conflicting Recovery and Fill adjustments, and finding some other way to get the needed adjustments, typically at a later stage, in Photoshop.
Lightroom 4’s new version of these adjustments, on the other hand, are amazingly resilient. To demonstrate this, I took the RAW image shown below, and processed it in a way that would have been fatal in Lightroom 3. Here is the original image.

I performed a series of adjustments to create HDR-like effects in the image. I began by reducing the exposure a bit, to deepen the sky. Next I moved the new Highlight slider to the negative side, creating even more detail in the clouds, and lowered Whites slightly as well. This all could have been accomplished, or something rather like it, in LR 3, but not at the same time as the set of adjustments below.
I then brought out detail in the dark face of the barn by boosting the shadows as far as the slider would go. “Danger, Will Robinson” said my Lightroom 3-acclimated brain, but nothing terrible happened; nothing even remotely undesirable happened. So I moved on to dropping the blacks just enough to clean up the pure blacks in the windows a bit, and then adjusted the Clarity slider, which produces localized contrast.
Here the goal is to produce the type of weathered wood effect that Paul Caponigro achieved with the early high contrast photo papers. This is a dangerous game, and on top of the radical adjustments at both ends of the tonal range, should cause the image to fall apart into grainy, posterized results. But again, not so. The dynamic range of the new Canon 5D Mark lll, and Lightroom 4’s new Process 2012 produced unparalleled results. Here’s the overall image.

Even more impressive is the closeup view, where the recovered clouds in the sky, the opened-up barn face, and the enhanced wood texture all show in detail, with no noise, and no “ring around the collar” where the lights meet the darks.

Only time will tell what the true potential of Lightroom 4 and Process 2012 may be, but early tests such as this one show promise for improved editing functionality, and enhanced HDR-like processing, without artifacts, noise, or posterization.
Credits: C. David Tobie, Copyright 2012. Website: CDTobie.com Return to Blog’s Main Page
What you are doing here I’ve been trying to do in CS5 with some of my B&W photos I have been asked to hang in a doctor’s office. What you accomplished with LR4 I have been sweating out in CS5 and RAW processing plus lots of printing iterations and hand-wringing and never getting it completely satisfying. Looks as if it’s time for me to get LR and learn to use it.